How To Resolve Quickbooks Error H505
Quickbooks error h505 occurs when you have installed any antivirus and firewall in our system. Antivirus and firewalls are usually blocking unauthorized access to your computers.
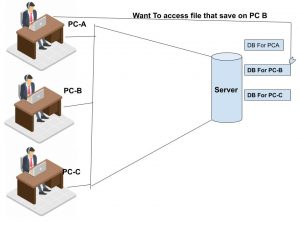
So when you are working in multiuser mode, and try to access company file that is available on other connected network PC. Then your firewalls have blocked them to communicate with Quickbooks application. If you are also facing Quickbooks error code H505, then you have to read this blog to get a relevant solution.
Cause Of Quickbooks Error H505
Most of QuickBooks error occurs where QuickBooks is used for multiuser. So when any user wants to access the company file which is not present into their own computer, and that company file is located at another computer which has not installed QuickBooks properly. Hence the user sees QuickBooks error H505. let’s see the below causes for better clarification.
- If your hosting server has blocked Quickbooks with a corporate file then it can cause behind Quickbooks error H505.
- Make sure your Quickbooks services such as QBFCMonitor and QuickbooksDBXX are activated on your PC.
- If your PC has corrupted.ND files then it will restrict Quickbooks desktop from opening any files on the network.
- If the DNS setting has not been done properly.
- And when computer firewall settings aborted to get company files.
Things You Must Remember
- If you want to use Quickbooks as a multiuser mode then you have to install QuickBooks application on the server. Because without applications you will not able to use Quickbooks multiuser mode.
- Check your system there must be installed Quickbooks software on your computer.
- It has to be a Quickbooks desktop version with a license manager and database hosting only.
- For download, Quickbooks visit its official website.
So before fix QB error code H505, you will need to follow some initial steps.
Initial Steps To Fix Quickbooks Error Code H505
- Your Quickbooks Desktop version must be updated first.
- And then you need to generate a company file.
- Then start Quickbooks tools hub to fix the quick error.
- After that run Quickbooks database server manager.
- And finally, configure your firewall setting to fix the error.
Now let’s see how to resolve QuickBooks error code H505?
Various Steps To Resolve Quickbooks Error code H505 Code?
Quickbooks users face various types of error but their solution is very easy and self-treatable. Hence let us see the below steps to resolve Quickbooks error code H505.
Step 1 It’s Better To Use Quickbooks Tool Hub
Quickbooks tool hub is a set of 5 different tools. and each tool has its own capability of fixing Quickbooks errors. Like Quickbooks file doctor is designed for fixing Quickbooks error h series and 6000 series. So let’s see how to resolve Quickbooks error h505 using Quickbooks tool hub.
- first, close all applications of your desktop computer or laptop
- then download and install Quickbooks Tool hub
- After installing Quickbooks tool hub clicks on tool hub icon.
- Then go to the Network issue section and click on Quickbooks database server manager(QBDSM).
- Now select company file that has Quickbooks error h505 by using the browse button and click on Start scan button
- QBDSM will fix your Quickbooks error code h505 and fix firewall settings automatically.
- You have to follow all the above steps on each workstation that throw Quickbooks error h505
Finally, you can check each workstation if you are able to work smoothly in multi-user mode. It means you have fixed all errors.
Else Check Quickbooks Server are Running in your Computer
- First click on the start menu of the connected server computer
- Or you can also use Window+R key to open the run window
- then type write service.msc in the text field or run window and press Enter
- Now search for the QuickbooksDBXX from the list and double click on it
- Then you have to choose the Automatic startup type, where its status must be start position.
- Now go to the recovery tab and click on Restart The service from the drop-down list of each menu
- Finally, click on Apply and press OK button to keep changes
- And also you have to repeat all the above steps for QBCFmonitorservices.
Step 2 Check The Hosting And Services
Method 1
- On each hosting system, open QuickBooks and go to the “File” menu => “Utilities” icon.
- See Host Multi-User Access on the listing, if the current system isn’t hosting the file. Proceed to a different laptop computer. bear in mind don’t amendment something.
- Remember if you see ‘Stop victimization Multi-User Hosting Access’ icon then choose it
- Then you would like to shut the go in the corporate file, simply you have got to click on the “yes” icon.
Method 2 check Quickbooks Services
1 First of all, You have to start QuickbooksDBXX and QBCFMonitor services.
- Then click on the start icon which exists in the window.
- Press the Window+ R to start the run window.
- Then type MSC into the run box so that the MSC window can open.
2 Service Window: Scroll down and exist for the QuickBooksDBXX service.
3 If you are not able to visit the QuickBooksDBXX service:
- The database server manager must be installed on the server.
- If you start the app on your PC, just you need to select Start QuickBooks And confirm that hosting is enabled.
- Now simply right click of a mouse button and select run QuickBooksDBXX service and confirm that the startup type is and the service is standing.
- Now You have to click on the “Recovery” icon
- Open computer system menu selects restart, thus it automatically restarts the QuickBooks DB service if it fails. Do the same again and again.
- Replay the above all steps for QBCFMonitor Service
- Now you have to open multiuser mode on every shared PC or workstation.
Step3 Create a new folder in your company file and discuss it by enabling access to discuss company files
- You have to create a new folder on the hosting computer.
- Now share Create Folder and Set Window to get access to permissions to share company files.
- Now copy the .qbw file to the new folder.
- And open your company’s files in multi-user mode to see the error is fixed or not.
Step 4 Edit the host file
Sol 1: Find the IP address and computer name of the server and workstation
- The first step is to hold “Windows + R” to open the “run dialog box”.
- After that, the user has to type “and” and then hit “Enter” to open a command prompt window.
- Then you have to run cmd command “ipconfig/all”.
- Keep a note somewhere for hostname and IP address, because you have to repeat this process on each system.
Step 2: Edit Windows Host File
Then edit the Windows host file:
- Users should go to “Shut down QuickBooks” and “Start Menu”.
- After that, the user needs to go to the PC and follow the “C: IWindowsiSystem32IDriversiEtc or CIWindows1Syswow641DriverslEtc” path.
- If you didn’t find the window folder then see the below steps.
- To view hidden files, the user has to click on the “View tab” and then click on “Hidden Items”.
- After that, the user has to right-click on “Host File” and then choose “Open With”, open it with notepad.
- The next step of the process is to fill in “IP address and computer name”. When entering details, the user needs to use the “tab key” instead of the spacebar to enter the space between the IP address and the system name. See the image below:
Step 5 Configure your firewall port settings
Important: Generally, the QuickBooks File Doctor tool usually opens your firewall ports and configures them automatically. If your problem is not resolved, you can follow these steps:
- First, open the Run dialog box by pressing the Windows + R keys simultaneously.
- After that, open the control panel through the run command.
- Choose the System and Security options and open the Windows Defender Firewall.
- Now let’s see the advanced settings.
- Then the inbound rule and then choose the new rule
- Choose a port and click on Next
- Make sure you have selected the TCP option here.
- Now you have to specify the port for your Quickbooks version.
To find QuickBooks dynamic ports
- First, click on the Start button and search for QuickBooks Database Server Manager and press Enter key.
- Then click on the Port Monitor tab
- Here you can see the port number for your QuickBooks version.
- Copy the port number, you can use it during firewall configuration
Conclusion
We have given a complete solution to fix Quickbooks error H505. Follow all the steps carefully and don’t delete anything while following steps. Make sure your firewall setting has been configured properly. If it will not configure properly then you will not able to resolve QuickBooks error. Always use an updated version of QB’s latest version, because of the add some extra features and fix old error issues. And if you still getting QB error h505 then you will need to contact our Quickbooks customer service team. They are highly educated and well experienced in Quickbooks. our Quickbooks support team reduces your frustration in a few seconds. Read More »How To Resolve Quickbooks Error H505